This is the other method of opening rings that I usually use if the rings are small, or if there are no picots close to the end of the rings. I use a blunt needle or my tiny hook with this method. It can be a bit of a hassle, especially if using fine thread, but sometimes it needs to be done, right?
 |
| Pic 1 |
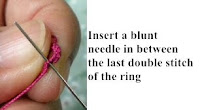
Bring the shuttle thread towards the left a bit so that you can see the last double stitch of the ring. Then insert a blunt needle, or the tiny hook, in between the half-stitches of the last double stitch, (pic 2). The purpose is to catch the core thread with the needle or the hook.
 |
| Pic 2 |
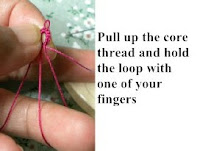
Pull up the core thread with the needle/hook (pic 3). As you try to pull up the thread, give it a slight jiggle to loosen up the first double stitch. You may have to try this a few times to make sure that you catch the core thread fully and not split it up. After pulling up the core thread from between the half-stitches, do not let go if it. Instead hold the loop with one of your fingers.
 |
| Pic 3 |
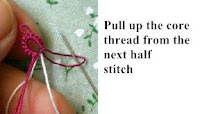
Then pull up the core thread from between the next half-stitch, (pic 4). As you do this release the loop that is around your finger.
 |
| Pic 4 |
A loose shape of a double stitch should be visible, (pic 5) which is formed with the thread form the shuttle. Enlarge the 'double-stitch' and slide the shuttle through.
 |
| Pic 5 |
Do not pull the shuttle thread tight after passing the shuttle through the loop. Instead, keep a slack in the thread. Pull the two threads together to bring up another loop as shown in pic 6. Slide the shuttle through this new loop to finish the step.
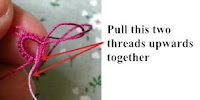 |
| Pic 6 |
The last step (as in Pic 6) completes the step of undoing the last double stitch in the ring. In the process, the ring loosens up slightly (pic 7). You can now pull up the core thread at the base of the ring to to get a bigger loop before you start to unpick the following double stitches, or pull apart at the picot as in Method 1 shown in the previous post. If this is still not possible, you can repeat the steps above for the next double stitch in the ring.
 |
| Pic 6 |
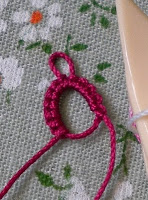 |
| Pic 7 |
There may be other ways to open a closed ring but these two methods work for me. I hope it helps you somewhat.


You have admirably described the two methods I use. I've never been able to explain this second method to anybody; I stumbled on it after much trial and error when I was first learning to tat. I'm so glad you posted this so I'll have someplace to refer people to.
ReplyDeleteFantastic, Jon! This will work on Josephines, too. I've got to try this. Thank you every so much!
ReplyDeleteGreat idea, and very well explained. I'll have to try this. Thanks!
ReplyDeleteAfter I mentioned in the chat that so far I did not need to open up any rings. Well lately, there are too many instances I had to open rings.
ReplyDeleteI knew there was a way to do this method but your explanation is so easy to follow.
Jon you have saved the day once again! Thank you... :)
ReplyDelete